- Read more
- Read more
- Read more
- Read more Connecting WordPress and FileMaker | Codence Integrating ChatGPT with Claris FileMaker | Codence JotForm to FileMaker Tutorial | Codence | Blog Post Show Your FileMaker Data in WordPress | Codence FileMaker and WooCommerce Integration | Codence
- Read more
- Read more
- Read more
- Read more
- Read more
- Read more
- Read more
- Read more
- Read more
- Read more
- Read more
- Read more
- Read more
- Read more
- Read more
- Read more
- Read more
- Read more
- Read more
- Read more
- Read more
- Read more
- Read more
- Read more
- Read more
- Read more
- Read more
- Read more
- Read more
- Read more
- Read more Connecting WordPress and FileMaker | Codence Integrating ChatGPT with Claris FileMaker | Codence JotForm to FileMaker Tutorial | Codence | Blog Post Show Your FileMaker Data in WordPress | Codence FileMaker and WooCommerce Integration | Codence
- Read more
- Read more
- Read more
- Read more
Read more
Read more
- Connecting WordPress and FileMaker | Codence
- Integrating ChatGPT with Claris FileMaker | Codence
- JotForm to FileMaker Tutorial | Codence | Blog Post
- Show Your FileMaker Data in WordPress | Codence
- FileMaker and WooCommerce Integration | Codence
Read more
- Connecting WordPress and FileMaker | Codence
- Integrating ChatGPT with Claris FileMaker | Codence
- JotForm to FileMaker Tutorial | Codence | Blog Post
- Show Your FileMaker Data in WordPress | Codence
- FileMaker and WooCommerce Integration | Codence
Read more
Read more
- Connecting WordPress and FileMaker | Codence
- Integrating ChatGPT with Claris FileMaker | Codence
- JotForm to FileMaker Tutorial | Codence | Blog Post
- Show Your FileMaker Data in WordPress | Codence
- FileMaker and WooCommerce Integration | Codence
Read more
- Connecting WordPress and FileMaker | Codence
- Integrating ChatGPT with Claris FileMaker | Codence
- JotForm to FileMaker Tutorial | Codence | Blog Post
- Show Your FileMaker Data in WordPress | Codence
- FileMaker and WooCommerce Integration | Codence
Read more
Read more
- Connecting WordPress and FileMaker | Codence
- Integrating ChatGPT with Claris FileMaker | Codence
- JotForm to FileMaker Tutorial | Codence | Blog Post
- Show Your FileMaker Data in WordPress | Codence
- FileMaker and WooCommerce Integration | Codence
Read more
Read more
- Connecting WordPress and FileMaker | Codence
- Integrating ChatGPT with Claris FileMaker | Codence
- JotForm to FileMaker Tutorial | Codence | Blog Post
- Show Your FileMaker Data in WordPress | Codence
- FileMaker and WooCommerce Integration | Codence
Read more
Read more
- Connecting WordPress and FileMaker | Codence
- Integrating ChatGPT with Claris FileMaker | Codence
- JotForm to FileMaker Tutorial | Codence | Blog Post
- Show Your FileMaker Data in WordPress | Codence
- FileMaker and WooCommerce Integration | Codence
Read more
Read more
- Connecting WordPress and FileMaker | Codence
- Integrating ChatGPT with Claris FileMaker | Codence
- JotForm to FileMaker Tutorial | Codence | Blog Post
- Show Your FileMaker Data in WordPress | Codence
- FileMaker and WooCommerce Integration | Codence
Read more
Read more
- Connecting WordPress and FileMaker | Codence
- Integrating ChatGPT with Claris FileMaker | Codence
- JotForm to FileMaker Tutorial | Codence | Blog Post
- Show Your FileMaker Data in WordPress | Codence
- FileMaker and WooCommerce Integration | Codence
Read more
Read more
- Connecting WordPress and FileMaker | Codence
- Integrating ChatGPT with Claris FileMaker | Codence
- JotForm to FileMaker Tutorial | Codence | Blog Post
- Show Your FileMaker Data in WordPress | Codence
- FileMaker and WooCommerce Integration | Codence
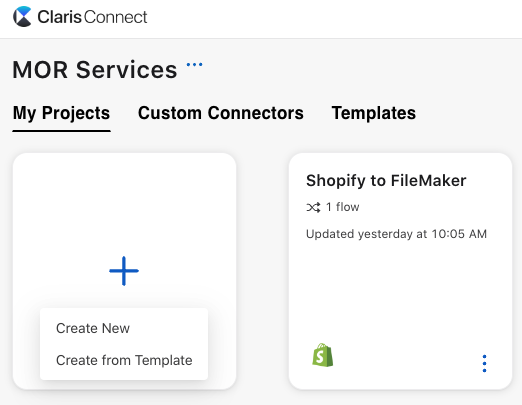
Read more
Read more
- Connecting WordPress and FileMaker | Codence
- Integrating ChatGPT with Claris FileMaker | Codence
- JotForm to FileMaker Tutorial | Codence | Blog Post
- Show Your FileMaker Data in WordPress | Codence
- FileMaker and WooCommerce Integration | Codence
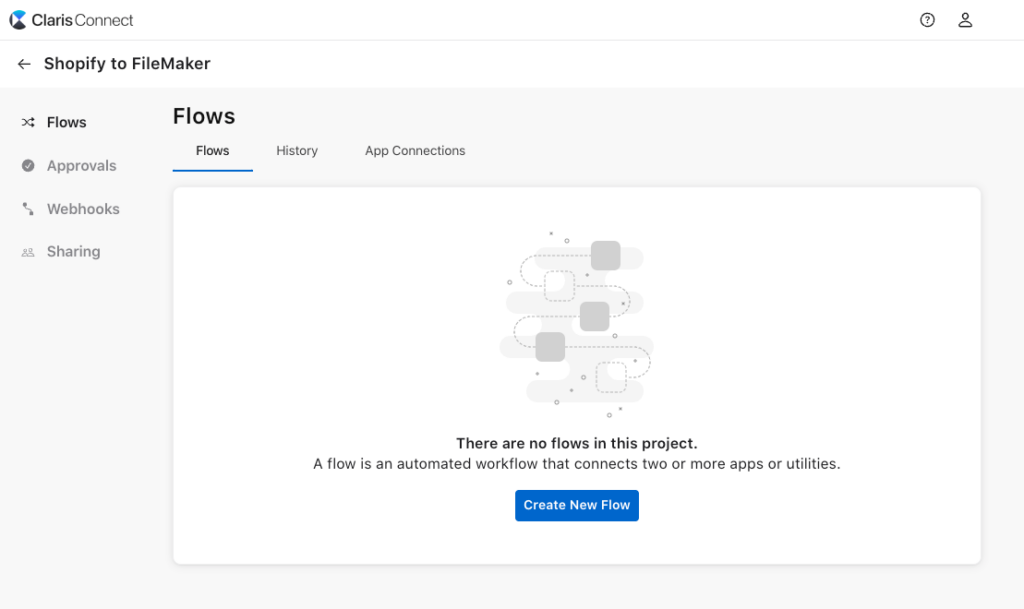
Read more
- Connecting WordPress and FileMaker | Codence
- Integrating ChatGPT with Claris FileMaker | Codence
- JotForm to FileMaker Tutorial | Codence | Blog Post
- Show Your FileMaker Data in WordPress | Codence
- FileMaker and WooCommerce Integration | Codence
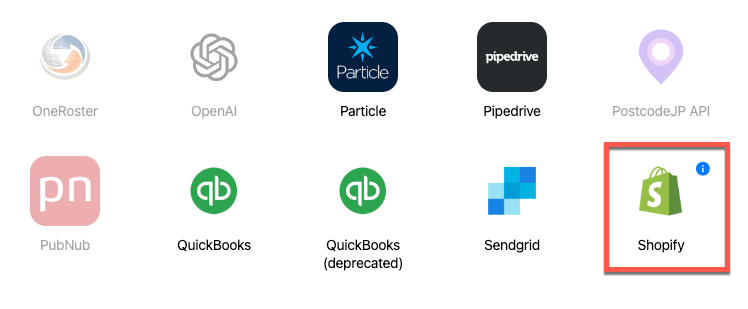
Read more
- Connecting WordPress and FileMaker | Codence
- Integrating ChatGPT with Claris FileMaker | Codence
- JotForm to FileMaker Tutorial | Codence | Blog Post
- Show Your FileMaker Data in WordPress | Codence
- FileMaker and WooCommerce Integration | Codence
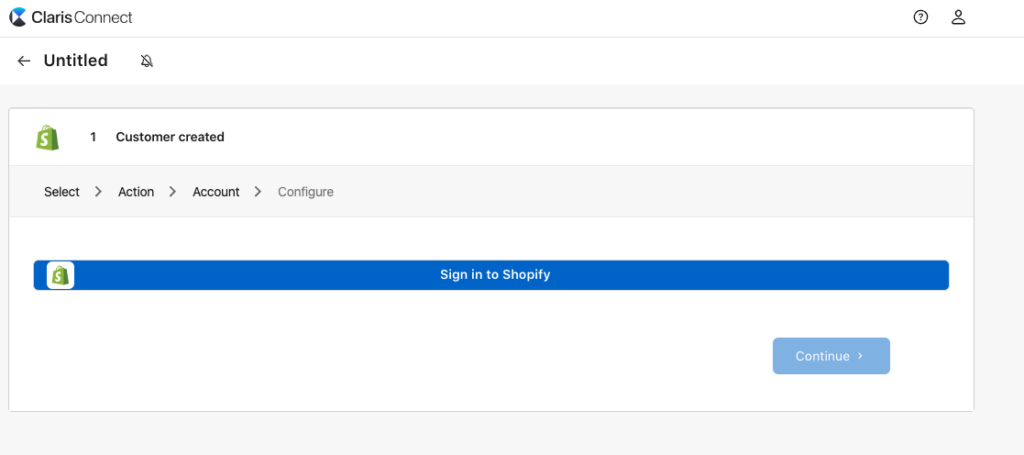
Read more
Read more
- Connecting WordPress and FileMaker | Codence
- Integrating ChatGPT with Claris FileMaker | Codence
- JotForm to FileMaker Tutorial | Codence | Blog Post
- Show Your FileMaker Data in WordPress | Codence
- FileMaker and WooCommerce Integration | Codence
Read more
Read more
- Connecting WordPress and FileMaker | Codence
- Integrating ChatGPT with Claris FileMaker | Codence
- JotForm to FileMaker Tutorial | Codence | Blog Post
- Show Your FileMaker Data in WordPress | Codence
- FileMaker and WooCommerce Integration | Codence
Read more
- Connecting WordPress and FileMaker | Codence
- Integrating ChatGPT with Claris FileMaker | Codence
- JotForm to FileMaker Tutorial | Codence | Blog Post
- Show Your FileMaker Data in WordPress | Codence
- FileMaker and WooCommerce Integration | Codence
Read more
- Connecting WordPress and FileMaker | Codence
- Integrating ChatGPT with Claris FileMaker | Codence
- JotForm to FileMaker Tutorial | Codence | Blog Post
- Show Your FileMaker Data in WordPress | Codence
- FileMaker and WooCommerce Integration | Codence
Read more
- Connecting WordPress and FileMaker | Codence
- Integrating ChatGPT with Claris FileMaker | Codence
- JotForm to FileMaker Tutorial | Codence | Blog Post
- Show Your FileMaker Data in WordPress | Codence
- FileMaker and WooCommerce Integration | Codence
Read more
- Connecting WordPress and FileMaker | Codence
- Integrating ChatGPT with Claris FileMaker | Codence
- JotForm to FileMaker Tutorial | Codence | Blog Post
- Show Your FileMaker Data in WordPress | Codence
- FileMaker and WooCommerce Integration | Codence
Read more
- Connecting WordPress and FileMaker | Codence
- Integrating ChatGPT with Claris FileMaker | Codence
- JotForm to FileMaker Tutorial | Codence | Blog Post
- Show Your FileMaker Data in WordPress | Codence
- FileMaker and WooCommerce Integration | Codence
Read more
Read more
- Connecting WordPress and FileMaker | Codence
- Integrating ChatGPT with Claris FileMaker | Codence
- JotForm to FileMaker Tutorial | Codence | Blog Post
- Show Your FileMaker Data in WordPress | Codence
- FileMaker and WooCommerce Integration | Codence
Read more
- Connecting WordPress and FileMaker | Codence
- Integrating ChatGPT with Claris FileMaker | Codence
- JotForm to FileMaker Tutorial | Codence | Blog Post
- Show Your FileMaker Data in WordPress | Codence
- FileMaker and WooCommerce Integration | Codence
Read more
- Connecting WordPress and FileMaker | Codence
- Integrating ChatGPT with Claris FileMaker | Codence
- JotForm to FileMaker Tutorial | Codence | Blog Post
- Show Your FileMaker Data in WordPress | Codence
- FileMaker and WooCommerce Integration | Codence
Read more
- Connecting WordPress and FileMaker | Codence
- Integrating ChatGPT with Claris FileMaker | Codence
- JotForm to FileMaker Tutorial | Codence | Blog Post
- Show Your FileMaker Data in WordPress | Codence
- FileMaker and WooCommerce Integration | Codence
Read more
Read more
- Connecting WordPress and FileMaker | Codence
- Integrating ChatGPT with Claris FileMaker | Codence
- JotForm to FileMaker Tutorial | Codence | Blog Post
- Show Your FileMaker Data in WordPress | Codence
- FileMaker and WooCommerce Integration | Codence
Read more
- Connecting WordPress and FileMaker | Codence
- Integrating ChatGPT with Claris FileMaker | Codence
- JotForm to FileMaker Tutorial | Codence | Blog Post
- Show Your FileMaker Data in WordPress | Codence
- FileMaker and WooCommerce Integration | Codence
Read more
Read more
- Connecting WordPress and FileMaker | Codence
- Integrating ChatGPT with Claris FileMaker | Codence
- JotForm to FileMaker Tutorial | Codence | Blog Post
- Show Your FileMaker Data in WordPress | Codence
- FileMaker and WooCommerce Integration | Codence
Read more
- Connecting WordPress and FileMaker | Codence
- Integrating ChatGPT with Claris FileMaker | Codence
- JotForm to FileMaker Tutorial | Codence | Blog Post
- Show Your FileMaker Data in WordPress | Codence
- FileMaker and WooCommerce Integration | Codence

Read more
Read more
- Connecting WordPress and FileMaker | Codence
- Integrating ChatGPT with Claris FileMaker | Codence
- JotForm to FileMaker Tutorial | Codence | Blog Post
- Show Your FileMaker Data in WordPress | Codence
- FileMaker and WooCommerce Integration | Codence
Read more
- Connecting WordPress and FileMaker | Codence
- Integrating ChatGPT with Claris FileMaker | Codence
- JotForm to FileMaker Tutorial | Codence | Blog Post
- Show Your FileMaker Data in WordPress | Codence
- FileMaker and WooCommerce Integration | Codence
Read more
Built with you in mind
Speak to one of our expert consultants about making sense of your data today. During
this free consultation, we'll address your questions, learn more about your business, and
make some immediate recommendations.


